
As you probably know or not, this weekend, Paris held the Open Infra summit in the legendary Ecole Polytechnique. The event was co-located by Gerrit User Summit and VM Migration Day as well. Our goal from this blog? It is to rewind time, relive the three days, and take you along some of the interesting presentations we attended.
VMware to OpenStack with Ansible OS-Migrate
Amid growing concerns over VMware licensing, many organizations are considering OpenStack as an alternative. A key aspect of this transition is migrating virtual machines (VMs) from VMware to OpenStack. During the summit, several solutions were showcased. In this blog, we’ll focus on os-migrate, an Ansible collection that was created to facilitate such a migration.
This collection supports multiple types of migration:
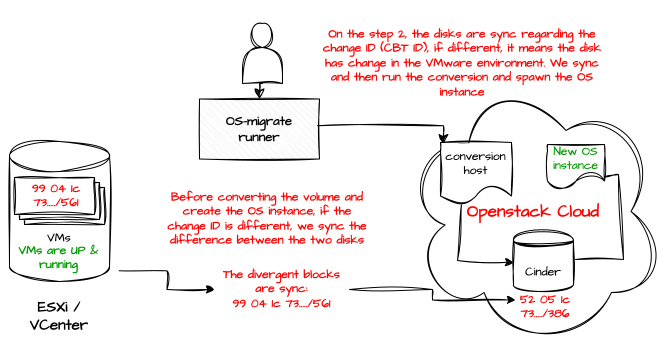
- The default migration method uses an nbdkit server with a conversion host (an OpenStack instance hosted in the destination cloud). This approach enables the use of CBT (Change Block Tracking) and allows for near-zero downtime during migration.
- The second method leverages virt-v2v bindings with a conversion host. You can either use an existing OpenStack instance as the conversion host or let OS-Migrate automatically deploy one for you.
- A third option allows you to skip the conversion host entirely and perform the migration directly on a Linux machine. In this case, the converted volume can be uploaded as a Glance image or later used as a Cinder volume. However, this approach is not recommended for large disks or a high number of VMs, as its performance is significantly slower compared to the other methods.
Let’s focus on the first approach, which consists of creating a conversion VM on the destination, attaching a Cinder volume to this VM, and initiating a full copy of the VM’s disk to the attached volume using an nbdkit server. At this time, the CBT ID from the source VMware disk is recorded and written as metadata on the target Cinder volume

After the initial copy, the tool compares the CBT ID in Cinder metadata with the current ID on the source disk; if they differ, only the changed blocks(delta) are transferred.
Once the delta transfer is complete, the conversion host launches a disk format conversion to a format that is acceptable by KVM, the VM is instantiated in the destination OpenStack environment, and started, resulting in minimal downtime during the migration.
OVN traffic flow & Troubleshooting
OVN is steadily gaining traction in both the OpenStack and Kubernetes communities. This trend was evident at the summit, where multiple talks on OVN were held. Each session was packed, with no seats left, highlighting the growing interest in OVN; therefore, the ability to troubleshoot effectively is no longer optional. An important step for troubleshooting is knowing the commands and doing the mapping between OpenStack resources(ports, routers…) to the OVN object.
I invite you to check the sheet code GitHub page with the steps/commands to map these resources.
Who framed RabbitMQ?
Who didn’t suffer with RabbitMQ while managing an OpenStack cluster, getting messages like message with id xxx timeout, losing a queue when a node is down, is a routine in the career of an OpenStack administrator.
Here are some of the advices that were shared during the presentation:
- Upgrade to version 4.1 of RabbitMQ
This version is shipped with better throughput, parallelism, and less CPU utilization for Quorum queues.
Classic queue mirroring (HA classic mirrored queues) was removed in 4.0. You need to migrate to Quorum queues before upgrading. They are supported as version 3.8 of RabbitMQ.
To activate it, add this section to oslo.messging section of your services
[os.messaging]
rabbit_quorum_queue = True
rabbit_transient_quorum_queue = True
- Avoid missed Heartbeats
I guess we all saw the repeated messages in RabbitMQ logs for closed connections. This was caused by mutiple issue that was fixed in the pyamqp which was not respecting the timeout, so make sure you’re using the latest version. Another fix would be to change all services using Apache’s Multi-Processing Module (MPM) from worker to event.
- Avoid Queue churn
For you who are not famillaire with Queue churn. Queue churn refers to the rapid creation and deletion of queues in RabbitMQ, this is the case with transient queues like reply and fanout queues.
Reply queues: Are temporary queues per RPC call, as the name implies when a service like nova-api make a request to nova-compute that needs a reply, it will create a queue for this response only once the RPC call is finished, the queue is deleted.
Fanout queues: Fanout are more like broadcast queues message is delivered to all suscripers without any filter.
To fix this issue use the configuration below
[os.messaging]
use_queue_manager = True
hostname = controller-01 #Put the name of you're host
processname = neutron
Enabling use_queue_manager will force Oslo Messaging to use consistent queue names based on hostname and process name instead of random UUIDs. This lets services reuse the same queues after restarts, reducing RabbitMQ overhead and startup time. It also simplifies debugging RabbitMQ as queues are identified by host and service name.
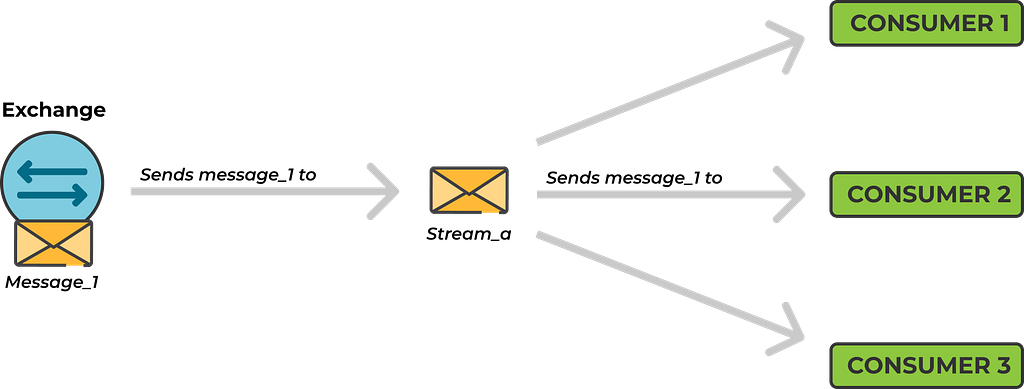
- Streams
Like quorum queues, stream queues were introduced in RabbitMQ 3.8. They work similarly to Kafka topics. Instead of creating and managing many transient, random queues (one per consumer or service instance).

With streams all messages are written to a single append-only log that is persisted to disk. This allows services to replay messages if a consumer was down when the messages were originally published.
[os.messaging]
rabbit_stream_fanout = True
Since messages are written to disk, make sure to configure RabbitMQ policy to delete old messages to prevent the disk from filling up.
rabbitmqctl set_policy stream-policy ".*_fanout.*"
  '{"max-length-bytes":15000000, "stream-max-segment-size-bytes":5000000}'
  --apply-to streams
Beyond Overcommit: Monitoring-Aware OpenStack Nova Scheduling
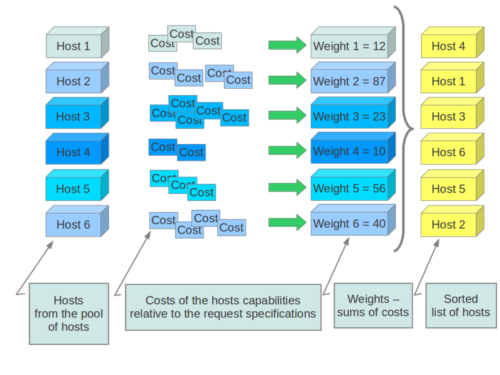
To place a VM on a hypervisor, the nova-scheduler uses a set of filters and weights. With filters, it eliminates unsuitable hypervisors. For example, the AggregateInstanceExtraSpecsFilter ensures that if a VM is created with a specific flavor matching an aggregate, only the hypervisors in that aggregate are returned.
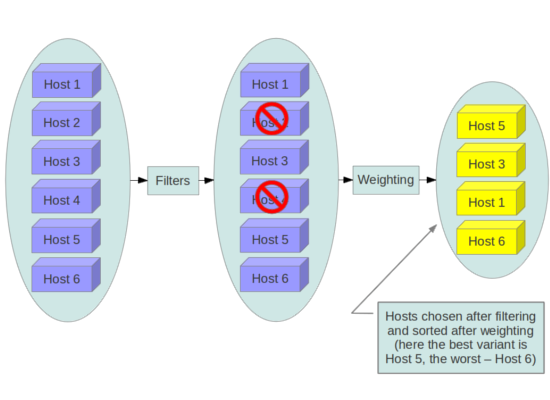
Weights, on the other hand, determine the most suitable host based on the requested specifications, such as RAM, CPU, disk space, the number of VMs already on the hypervisor, and other factors.
Until now, everything seems perfect. This is already the default behavior in OpenStack. But what’s new? Before we move to that, are you familiar with overcommit?
Overcommit is the practice of allocating more resources than physically exist on the hypervisor. In most cases, requesting 4 CPUs and 8 GB of RAM for a VM doesn’t mean these resources will be fully used, or used simultaneously with other VMs on the same hypervisor. To avoid wasting resources, we can allocate more VMs than the physical capacity.
In Nova, this practice can be controlled using:
- cpu_allocation_ratio: determines how much CPU can be overcommitted.
- ram_allocation_ratio: determines how much RAM can be overcommitted.
If you’re not seeing the issue with this, let me explain. When running a large public cloud, we can’t know whether a VM will be fully utilized or only partially used. This uncertainty can lead to hypervisors with active VMs becoming overloaded, since we are overcommitting resources. Additionally, the allocation ratios we configure (cpu_allocation_ratio and ram_allocation_ratio) are static and do not adjust dynamically based on the current state of the hypervisor.
To address this, we need a specific filter or plugin that can, for example, check the average CPU usage over the last 24 hours. Based on this information, we can decide whether to include or exclude the hypervisor. This will allow us to schedule tasks based on the actual state of the hypervisors.

You can start building you’re own filter base on this Github repository.
I’ve only selected a few talks from three days of the summit. I hope you found these presentations interesting as i did.
See you in another blog!
Beyyy !